x86下系统调用 背景 经过之前的汇编实践-解析命令行参数 学习,发现在进行系统调用时,不管是调用syscall(), 还是libc封装的系统调用,最终都是通过int $0x80(32位 i386)或者syscall(x86_64)进入内核态从而调用对应的底层实现,x86_32是通过一个0x80的软中断实现的,而x86_64是通过汇编指令syscall实现。
疑问:
0x80的软中断策略如何实现系统调用 syscall汇编指令具体做了什么?(64bit) 之前已经简单的学习过内嵌汇编 linux-assembly入门学习 ,在深入探究之前简单的实践学习一下函数调用逻辑。
实践-函数调用堆栈逻辑 实践分为三部分,验证call进行函数调用时堆栈,rbp, rsp指针的处理,不进行编译优化
两个参数传递 八个参数传递 复杂参数传递 两个参数 汇编模拟实现call add,如下
1 2 3 4 5 6 7 8 9 10 11 12 int add (int a, int b) int c = a + b; return c; } int main () int a = 1 ; int b = 2 ; int c = add(a, b); return 0 ; }
gcc -S add.c进行编译生成汇编进行修改成可以运行的汇编语言
汇编实现call add 1 2 3 4 5 6 7 8 9 10 11 12 13 14 15 16 17 18 19 20 21 22 23 24 25 26 27 28 29 30 31 32 33 .text .globl _start add: pushq %rbp movq %rsp, %rbp movl %edi, -20 (%rbp) movl %esi, -24 (%rbp) movl -20 (%rbp), %edx movl -24 (%rbp), %eax addl %edx, %eax movl %eax, -4 (%rbp) movl -4 (%rbp), %eax popq %rbp ret _start: pushq %rbp movq %rsp, %rbp subq $16 , %rsp movl $1 , -4 (%rbp) movl $2 , -8 (%rbp) movl -8 (%rbp), %edx movl -4 (%rbp), %eax movl %edx, %esi movl %eax, %edi call add movl %eax, -12 (%rbp) movl $0 , %eax exit : movq $60 , %rax movq $0 , %rdi syscall
通过gdb记录rbp, rsp的变化
gdb记录rbp, rsp的变化 1 2 3 4 5 6 7 8 9 10 11 12 13 14 15 16 17 18 19 20 21 22 23 24 25 26 27 28 29 30 31 32 33 34 35 36 37 38 39 40 41 42 43 44 45 46 47 48 49 50 51 52 53 54 55 56 57 58 59 60 61 62 63 64 65 66 67 68 69 70 71 72 73 74 75 76 77 78 79 80 81 82 83 84 85 86 87 88 89 90 91 92 93 94 95 96 97 98 99 100 101 102 ➜ call-args1 git:(master) ✗ gdb call-args-1 (gdb) b _start Breakpoint 1 at 0x400092 : file call-args-1. s, line 17. (gdb) b add Breakpoint 2 at 0x400078 : file call-args-1. s, line 4. (gdb) run Breakpoint 1 , _start () at call-args-1. s:17 17 pushq %rbp(gdb) p/x $rsp $1 = 0x7fffffffda90 (gdb) x/x 0x7fffffffda90 0x7fffffffda90 : 0x00000001 >>_start 只有一个参数,就是call-args-1 目标本身(gdb) p/x $rbp $2 = 0x0 >>rbp此时还是0 (gdb) n 18 movq %rsp, %rbp(gdb) x/x $rsp 0x7fffffffda88 : 0x00000000 >>push以后,栈增长,地址-8 字节(gdb) n 19 subq $16 , %rsp(gdb) x/x $rbp 0x7fffffffda88 : 0x00000000 >> rbp = rsp(gdb) n 20 movl $1 , -4 (%rbp)(gdb) x/x $rsp 0x7fffffffda78 : 0x00000000 >>栈顶下移16 (gdb) n 6 26 call add(gdb) info registers rax 0x1 1 rbx 0x0 0 rcx 0x0 0 rdx 0x2 2 rsi 0x2 2 rdi 0x1 1 rbp 0x7fffffffda88 0x7fffffffda88 rsp 0x7fffffffda78 0x7fffffffda78 (gdb) n Breakpoint 2 , add () at call-args-1. s:4 4 pushq %rbp(gdb) info registers rax 0x1 1 rbx 0x0 0 rcx 0x0 0 rdx 0x2 2 rsi 0x2 2 rdi 0x1 1 rbp 0x7fffffffda88 0x7fffffffda88 rsp 0x7fffffffda70 0x7fffffffda70 >>可以发现call调用会使rsp下移8 个字节,说明有入栈操作,开始add的堆栈 (gdb) n 5 movq %rsp, %rbp(gdb) x/x $rsp 0x7fffffffda68 : 0xffffda88 >>rbp入栈,栈顶下移8 位(gdb) n 6 movl %edi, -20 (%rbp)(gdb) x/x $rbp 0x7fffffffda68 : 0xffffda88 >>保证add开始前rbp = rsp,代表栈底 = 栈顶(gdb) n 7 13 popq %rbp >>add栈底的rbp出栈给rbp, 即调用者的栈底地址(gdb) n add () at call-args-1. s:14 14 ret (gdb) x/x $rbp 0x7fffffffda88 : 0x00000000 >>_start的栈底(gdb) x/x $rsp 0x7fffffffda70 : 0x004000b7 >>rbp出栈, rsp+8 , 发现call时入栈时存放的是调用者调用完成之后的下一条指令(gdb) n _start () at call-args-1. s:27 27 movl %eax, -12 (%rbp)(gdb) x/x $rsp 0x7fffffffda78 : 0x00000000 >>ret会将保存的rip出栈,给到rip(gdb) p/x $rip $4 = 0x4000b7 (gdb) disassemble _start Dump of assembler code for function _start: 0x0000000000400092 <+0 >: push %rbp 0x0000000000400093 <+1 >: mov %rsp,%rbp 0x0000000000400096 <+4 >: sub $0x10 ,%rsp 0x000000000040009a <+8 >: movl $0x1 ,-0x4 (%rbp) 0x00000000004000a1 <+15 >: movl $0x2 ,-0x8 (%rbp) 0x00000000004000a8 <+22 >: mov -0x8 (%rbp),%edx 0x00000000004000ab <+25 >: mov -0x4 (%rbp),%eax 0x00000000004000ae <+28 >: mov %edx,%esi 0x00000000004000b0 <+30 >: mov %eax,%edi 0x00000000004000b2 <+32 >: call 0x400078 <add> => 0x00000000004000b7 <+37 >: mov %eax,-0xc (%rbp) 0x00000000004000ba <+40 >: mov $0x0 ,%eax
对应的堆栈调用为如下,从上往下增长
1 2 3 4 5 6 7 8 data addr 代表 0x1 <--- 0x7fffffffda90 参数个数 0x0 <--- 0x7fffffffda88 pushq %rbp0x0 <--- 0x7fffffffda78 _start栈顶 subq $16 , %rsp0x004000b7 <--- 0x7fffffffda70 保存返回后的rip call add0xffffda88 <--- 0x7fffffffda68 _start栈底 pushq %rbp
从上我们可以看出堆栈调用的规律和顺序
1. 将调用者的栈底地址(即rbp的值) 入栈
2. rbp = rsp, 栈底和栈顶一致,栈顶可以subl设置
3. 对栈的处理为rbp - offset处理
4. 调用函数(call)时将 回调以后的下一个指令(rip)入栈
5. 函数重复1, 2
6. 函数执行完成将调用者的rbp出栈
7. ret返回,将保存的rip出栈,此时rbp, rsp,rip都指向调用者当参数小于6个时,采用寄存器按照顺序传参
八个参数 汇编模拟实现call add,如下
1 2 3 4 5 6 7 8 9 10 11 int add (int a, int b, int c, int d, int e, int f, int g, int h) int ext = 20 ; int j = a+b+c+d+e+f+g+h+ext; return j; } int main () int a = 1 , b = 2 , c = 3 , d = 4 , e = 5 , f = 6 , g = 7 , h = 8 ; int i = add(a, b, c, d, e, f, g, h); return 0 ; }
gcc -s add.c进行编译生成汇编进行修改成可以运行的汇编语言
汇编实现call add, 8个参数 1 2 3 4 5 6 7 8 9 10 11 12 13 14 15 16 17 18 19 20 21 22 23 24 25 26 27 28 29 30 31 32 33 34 35 36 37 38 39 40 41 42 43 44 45 46 47 48 49 50 51 52 53 54 55 56 57 58 59 60 61 62 63 64 65 66 .text .globl _start add: pushq %rbp movq %rsp, %rbp movl %edi, -20 (%rbp) movl %esi, -24 (%rbp) movl %edx, -28 (%rbp) movl %ecx, -32 (%rbp) movl %r8d, -36 (%rbp) movl %r9d, -40 (%rbp) movl $20 , -4 (%rbp) movl -20 (%rbp), %edx movl -24 (%rbp), %eax addl %eax, %edx movl -28 (%rbp), %eax addl %eax, %edx movl -32 (%rbp), %eax addl %eax, %edx movl -36 (%rbp), %eax addl %eax, %edx movl -40 (%rbp), %eax addl %eax, %edx movl 16 (%rbp), %eax addl %eax, %edx movl 24 (%rbp), %eax addl %eax, %edx movl -4 (%rbp), %eax addl %edx, %eax movl %eax, -8 (%rbp) movl -8 (%rbp), %eax popq %rbp ret _start: pushq %rbp movq %rsp, %rbp subq $48 , %rsp movl $1 , -4 (%rbp) movl $2 , -8 (%rbp) movl $3 , -12 (%rbp) movl $4 , -16 (%rbp) movl $5 , -20 (%rbp) movl $6 , -24 (%rbp) movl $7 , -28 (%rbp) movl $8 , -32 (%rbp) movl -24 (%rbp), %r9d movl -20 (%rbp), %r8d movl -16 (%rbp), %ecx movl -12 (%rbp), %edx movl -8 (%rbp), %esi movl -4 (%rbp), %eax movl -32 (%rbp), %edi pushq %rdi movl -28 (%rbp), %edi pushq %rdi movl %eax, %edi call add addq $16 , %rsp movl %eax, -36 (%rbp) movl $0 , %eax exit : movq $60 , %rax movq $0 , %rdi syscall
gdb验证逻辑结果如下
1 2 3 4 5 6 7 8 ➜ call-args2 git:(master) ✗ gdb call-args-2 (gdb) b call-args-2. s:32 Breakpoint 1 at 0x4000c5 : file call-args-2. s, line 32. (gdb) run Breakpoint 1 , add () at call-args-2. s:32 32 movl -8 (%rbp), %eax(gdb) p/x $eax $1 = 0x38
从汇编发现第7个参数和第8个参数采用入栈的方式,在add汇编中通过16(%rbp)和24(%rbp)寻址。栈的变化如下:
1 2 3 4 5 6 7 value 7 _start_rbp - 28 8 _start_rbp - 32 8 入栈 add_rbp +24 ,7 入栈 add_rbp +16 ,ret_next_rip _start_rbp
从上实践看出,当参数大于6个时,会通过参数倒序入栈,被调用者通过rbp + offset调用
结构体参数 汇编模拟实现call add,如下
汇编实现call add,结构体参数 1 2 3 4 5 6 7 8 9 10 11 12 13 14 15 16 17 18 19 20 struct TEST { int a1; int a2; int a3; }; void test_func (struct TEST *test_argv, int num) int sum; sum = test_argv->a2 + test_argv->a3; } int main () struct TEST test_argv =2 , .a3=3 }; test_func(&test_argv, 10 ); return 0 ; }
gcc -s add.c进行编译生成汇编进行修改成可以运行的汇编语言
汇编实现call add, 结构体参数 1 2 3 4 5 6 7 8 9 10 11 12 13 14 15 16 17 18 19 20 21 22 23 24 25 26 27 28 29 30 31 32 33 34 .text .globl _start test_func: pushq %rbp movq %rsp, %rbp movq %rdi, -24 (%rbp) movl %esi, -28 (%rbp) movq -24 (%rbp), %rax movl 4 (%rax), %edx movq -24 (%rbp), %rax movl 8 (%rax), %eax addl %edx, %eax movl %eax, -4 (%rbp) nop popq %rbp ret _start: pushq %rbp movq %rsp, %rbp subq $16 , %rsp movq $0 , -12 (%rbp) movl $0 , -4 (%rbp) movl $2 , -8 (%rbp) movl $3 , -4 (%rbp) leaq -12 (%rbp), %rax #相当于把-12 (%rbp) 这块内存的地址给到rax movl $10 , %esi movq %rax, %rdi call test_func movl $0 , %eax exit : movq $60 , %rax movq $0 , %rdi syscall
栈的变化和调用如下
1 2 3 4 5 6 7 0x00 _start_rbp3 rbp - 4 ------>rax+8 2 rbp - 8 ----->rax+4 0 rbp - 12 ---->地址给rax rbp -16 _start_rip _start_rbp ret_next_rip
从上看出,参数作为指针时, 参数指向的内存在栈上呈倒序,传递的是通过lea获取到的内存指针
从实验2和实验3也可以看出,虽然两块add栈都存储了参数,但是因为实验3参数其实是指针,因此通过->进行操作其实是操作指针指向的空间的偏移部分。
IA-32下系统调用的实现 32位系统调用是通过软中断0x80来实现的,因此重点追踪IA-32下软中断的实现。
IDT IDT全称INTERRUPT DESCRIPTOR TABLE ,记录这中断的相关信息
linux中使用的IDT申明在def_idts中
1 2 3 4 5 6 7 8 9 10 11 12 13 static const __initconst struct idt_data def_idts [] = INTG(X86_TRAP_DE, asm_exc_divide_error), #ifdef CONFIG_X86_32 TSKG(X86_TRAP_DF, GDT_ENTRY_DOUBLEFAULT_TSS), #else ISTG(X86_TRAP_DF, asm_exc_double_fault, IST_INDEX_DF), #endif ... #if defined(CONFIG_IA32_EMULATION) SYSG(IA32_SYSCALL_VECTOR, entry_INT80_compat), ... }
其中的每一项称为gate,def_idts下包含了如下四种gate
Interrupte gatetrap gatetask gate X86_32Interrupte gate with interrupt stackIDT和gate的结构实现如下:
1 2 3 4 5 6 7 8 9 10 11 12 13 14 15 16 17 18 19 20 struct idt_data { unsigned int vector ; >>中断号 unsigned int segment; >>GDT_ENTRY_KERNEL_CS*8 = 16 struct idt_bits bits; const void *addr; >>中断入口 }; struct gate_struct { u16 offset_low; u16 segment; struct idt_bits bits ; u16 offset_middle; #ifdef CONFIG_X86_64 u32 offset_high; u32 reserved; #endif } __attribute__((packed)); typedef struct gate_struct gate_desc ;static gate_desc idt_table[IDT_ENTRIES] __page_aligned_bss; >>注意,这是个页对齐的,之后需要映射到cea
在系统启动阶段通过trap_init进行配置,通过idt_setup_traps将全部的gate 描述填充在idt_table,并将对应的中断向量bit设置为1.
1 2 3 (gdb) x/8 x system_vectors >>第128 位设置为0 0xffffffff82edd880 <system_vectors>: 0x000fffff 0x00000000 0x00000000 0x00000000 0xffffffff82edd890 <system_vectors+16 >: 0x00000001 0x00000000 0x00000000 0x00000000
在cpu_init_exception_handling内部通过load_current_idt将idt_descr保存在IDTR寄存器中
1 2 3 4 static struct desc_ptr idt_descr __ro_after_init = .size = IDT_TABLE_SIZE - 1 , >>4095 = 256 *16 -1 ,实际作为偏移,0 ~4095 .address = (unsigned long ) idt_table, };
IDTR对应的读写指令为
1 2 3 4 5 6 7 8 static inline void store_idt (struct desc_ptr *dtr) asm volatile ("sidt %0" :"=m" (*dtr)) } static __always_inline void native_load_idt (const struct desc_ptr *dtr) asm volatile ("lidt %0" ::"m" (*dtr)) }
IDTR是一个64+16 bit构成的寄存器,前面保存线性基地址,后面保存偏移
1 2 3 4 5 6 47 (79 ) 1615 0 +--------------------------------------+---------------------------+ | | | | 32 (64 )-bit Linear Base Address | 16 -Bit Table Limit | | | | +------------------------------------------------------------------+
下面通过一个动态模块获取IDTR保存的值
1 2 3 4 5 6 7 8 9 10 11 12 13 14 static int store_idt_init (void ) struct desc_ptr desc_ptr_test ; pr_info("module store_idt enter\n" ); store_idt(&desc_ptr_test); pr_info("idt size is %u, idt base addr is %px in arch x86_64\n" , desc_ptr_test.size, (void *)desc_ptr_test.address); return 0 ; } static void store_idt_exit (void ) pr_info("module store_idt exit\n" ); } module_init(store_idt_init); module_exit(store_idt_exit);
运行如下
1 2 [ 33.018534 ] module store_idt enter [ 33.018736 ] idt size is 4095 , idt base addr is fffffe0000000000 in arch x86_64
gdb运行检查,保存的线性基地址和idt_table的地址不同,但是存储的数据是一致的
1 2 3 4 5 6 7 8 9 10 11 12 (gdb) p/x &idt_table $58 = 0xffffffff82eab000 (gdb) x/x 0xffffffff82eab000 0xffffffff82eab000 <idt_table>: 0x00100860 (gdb) x/x 0xfffffe0000000000 0 x fe0000000000: 0x00100860 (gdb) p/x &idt_table[1 ] $59 = 0xffffffff82eab010 (gdb) x/x 0xfffffe0000000010 0xfffffe0000000010 : 0x00100b30 (gdb) x/x 0xffffffff82eab010 0xffffffff82eab010 <idt_table+16 >: 0x00100b30
奇怪,为什么地址是不同的呢?检查地址区域,内存分配见x86_64/mm.txt , 发现这是一块cpu_entry_area区域
1 fffffe0000000000 | -2 TB | fffffe7fffffffff | 0.5 TB | cpu_entry_area mapping
检查代码流程,发现在trap_init中的cpu_init_exception_handling先保存了一次idt_table的symbol到IDTR,但是之后init_IRQ阶段通过idt_map_in_cea之后并且将cpu_entry_area的线性基地址保存在IDTR中,因此导致地址虽然不同,但是数据是一致的。
1 cea_set_pte(CPU_ENTRY_AREA_RO_IDT_VADDR, __pa_symbol(idt_table),PAGE_KERNEL_RO); >>将对应的idt_table物理页映射到cea, 且4096 字节正好一页,并且将页设置为只读
cea cea是一块指定了的线性内存区域,从fffffe0000000000开始,实际的内存分布为
1 2 3 4 CPU_ENTRY_AREA_BASE 映射到 idt_table CPU_ENTRY_AREA_BASE + PAGE_SIZE cpu 0 的 cea区域0xfffffe0000001000 CPU_ENTRY_AREA_BASE + PAGE_SIZE + 1 *CPU_ENTRY_AREA_SIZE cpu 1 的 cea区域0xfffffe000003C000 CPU_ENTRY_AREA_BASE + PAGE_SIZE + 2 *CPU_ENTRY_AREA_SIZE
单个cpu的cea区域抽象结构体大致为:
1 2 3 4 5 6 7 8 struct cpu_entry_area { char gdt[PAGE_SIZE]; //cs&ds段 + tss段 16字节 + ldt 16字节 struct entry_stack_page entry_stack_page; //per_cpu entry_stack_storage struct tss_struct tss; //tss per_cpu cpu_tss_rw #上面这三个都是per-cpu变量,且都是页对齐 struct cea_exception_stacks estacks; >>IST entry per_cpu ... };
cea的设置也在trap_init阶段,通过setup_cpu_entry_areas将映射cea的gdt和entry_stack_page,tss等映射到每个cpu 这些参数对应的物理地址区域。
每一个cpu的gdt_page中保存的是kernel和user模式下的代码段和数据段描述符,如下
1 2 3 4 5 6 7 8 DEFINE_PER_CPU_PAGE_ALIGNED(struct gdt_page, gdt_page) = { .gdt = { [GDT_ENTRY_KERNEL32_CS] = GDT_ENTRY_INIT(0xc09b , 0 , 0xfffff ), [GDT_ENTRY_KERNEL_CS] = GDT_ENTRY_INIT(0xa09b , 0 , 0xfffff ), [GDT_ENTRY_KERNEL_DS] = GDT_ENTRY_INIT(0xc093 , 0 , 0xfffff ), [GDT_ENTRY_DEFAULT_USER32_CS] = GDT_ENTRY_INIT(0xc0fb , 0 , 0xfffff ), [GDT_ENTRY_DEFAULT_USER_DS] = GDT_ENTRY_INIT(0xc0f3 , 0 , 0xfffff ), [GDT_ENTRY_DEFAULT_USER_CS] = GDT_ENTRY_INIT(0xa0fb , 0 , 0xfffff ), ...
除了CS和DS段描述符,TSS和LDT描述符之后也会加入其中,见fix_processor_context
GDT GDT全称为global descriptor table,是一些段描述符的集合,这些段描述符提供了段的基地址,访问权限等
1 2 3 4 5 6 7 8 9 10 11 struct desc_struct { u16 limit0; u16 base0; u16 base1: 8 , type: 4 , s: 1 , dpl: 2 , p: 1 ; u16 limit1: 4 , avl: 1 , l: 1 , d: 1 , g: 1 , base2: 8 ; } __attribute__((packed)); struct gdt_page { struct desc_struct gdt [GDT_ENTRIES ]; } __attribute__((aligned(PAGE_SIZE)));
这些段描述通过段选择(segment selector)分为以下几类,我们通过这些段选择来找到对应的段描述
1 2 3 4 5 6 7 8 #define GDT_ENTRY_KERNEL32_CS 1 #define GDT_ENTRY_KERNEL_CS 2 #define GDT_ENTRY_KERNEL_DS 3 #define GDT_ENTRY_DEFAULT_USER32_CS 4 #define GDT_ENTRY_DEFAULT_USER_DS 5 #define GDT_ENTRY_DEFAULT_USER_CS 6 #define GDT_ENTRY_TSS 8 >>2*8=16字节 #define GDT_ENTRY_LDT 10 >>2*8=16字节
每个cpu都有自己的GDT,在启动时也被映射到cea区域。我们将GDT线性基地址(cea或者per cpu)保存在GDTR寄存器中,注意,如果之后我们需要通过LTR指令写TR寄存器时,需要将该cpu的gdt地址写入,因为ltr标记TSS描述符实际内存flag部分的B位为busy时会写内存(gdtr + TSS偏移作为立即数),但是cea区域是RO的,因此使用cpu的gdt地址,不然会产生PG异常。见native_load_tr_desc
MSR_GS_BASE 这是gs寄存器,用户态可以用来自定义(不知道其他方法,因为wrmsr指令是用户层不可用的),内核态指向该cpu的per cpu区域地址。
在cpu_init过程中,通过load_percpu_segment
1 2 3 4 5 6 wrmsrl(MSR_GS_BASE, cpu_kernelmode_gs_base(cpu)); static inline unsigned long cpu_kernelmode_gs_base (int cpu) return (unsigned long )per_cpu(fixed_percpu_data.gs_base, cpu); }
将该cpu对应的per cpu部分的fixed_percpu_data.gs_base地址给到gs寄存器,由于fixed_percpu_data是per cpu区域的第一个成员
1 2 DEFINE_PER_CPU_FIRST(struct fixed_percpu_data,fixed_percpu_data) __aligned(PAGE_SIZE) __visible; EXPORT_PER_CPU_SYMBOL_GPL(fixed_percpu_data)
因此该cpu下的gs寄存器保存的是per cpu的基地址,也是该cpu对应的__per_cpu_offset
1 2 3 4 5 __per_cpu_start(0x0 ) --------__per_cpu_end -----percpu0区域 ------percpu1区域 | | | |-------------------__per_cpu_offset[0 ]-------------| | | | |------------------------__per_cpu_offset[1 ]----------------------------------|
打印每个cpu的gs寄存器,查看每个per cpu的基址
1 2 (gdb) p/x __per_cpu_offset $22 = {0xffff88803fc00000 , 0xffff88803fd00000 , 0xffffffff82cf5000 <repeats 510 times>} >>前两个有效,因为guest只有两个cpu
MSR_KERNEL_GS_BASE 因为MSR_GS_BASE寄存器 用户态和内核态的数值不一样,因此需要MSR_KERNEL_GS_BASE做为其暂储,正如其定义
1 #define MSR_KERNEL_GS_BASE 0xc0000102
因此用户态MSR_KERNEL_GS_BASE保存该cpu下的per cpu地址,内核态保存MSR_GS_BASE用户态的数值
任务管理 任务管理包括
TSS TSS 描述符 实际需要写入GDT TSS段描述符,占16字节 task任务寄存器 task 门描述符 IDT门 (暂不研究) TSS用来保存任务在cpu中的状态方便恢复,比如指向弹性栈的指针sp0等
1 2 3 4 struct tss_struct { struct x86_hw_tss x86_tss ; struct x86_io_bitmap io_bitmap ; } __aligned(PAGE_SIZE);
实际流程如下:
1 2 3 4 5 6 7 8 9 10 11 12 13 14 15 16 +----------------+ | x86_hw_tss | <-----------------| |--------------- |---->per cpu tss | | io_bitmap | | +----------------+ | | +----------------+ | | base0 | | |--------------- | | | base1 | | +----------------+ 指向---------------| | base2 | +----------------+ | base2 | +----------------+ per cpu gdt TSS段部分 ------ltr指令---写入任务寄存器,主要是指向x86_hw_tss地址
弹性栈 在进行系统调用时,是从用户态ring3切换到内核态ring0,linux实现中只有ring3和ring0,不同权限级别的切换,需要从用户栈切到内核栈,但并不是直接切到内核栈,而是先切换到弹性栈,再切到内核栈,这样可以在切换到内核栈前增加一些代码操作,该特性的增加见Use a per-CPU trampoline stack for IDT entries 。
本身sp0指向内核栈,rsp先切换到sp0指向的地址,但是由于引入弹性栈,因此sp0指向弹性栈,sp1指向内核栈,之后内核栈的指针也从sp1改动到cpu_current_top_of_stack,修改引入见git show 1591584。
对应task的stack entry_INT80_compat断点调试如下
1 2 3 4 5 6 7 8 9 10 11 12 13 14 15 16 17 18 ➜ linux git:(master) ✗ gdb vmlinux GNU gdb (Ubuntu 11.1-0ubuntu2) 11.1 (gdb) b entry_INT80_compat Breakpoint 1 at 0xffffffff81c015a0 : file arch/x86/entry/entry_64_compat.S, line 268. (gdb) target remote:1234 Remote debugging using :1234 0xffffffff81b3e810 in default_idle () at arch/x86/kernel/process.c:729 (gdb) c Continuing. >>之后通过汇编进行系统调用 int 0x80 Thread 1 hit Breakpoint 1, 0xffffffff81c015a0 in entry_INT80_compat () at arch/x86/entry/entry_64_compat.S:268 268 int3(gdb) n 304 SWAPGS (gdb) p $rsp $1 = (void *) 0xfffffe000003dfd8 >>此时已经在弹性栈中
sp0的设置在cpu_init过程中如下:
1 2 3 4 5 6 load_sp0((unsigned long )(cpu_entry_stack(cpu) + 1 )); >>注意+1 其实是+ sizeof (struct entry_stack) static __always_inline struct entry_stack *cpu_entry_stack (int cpu) return &get_cpu_entry_area(cpu)->entry_stack_page.stack ; }
可以发现其实是CEA中该cpu的entry_stack_page部分
首先需要确定任务调动在哪个cpu上,确定在第二个cpu上
1 2 (gdb) p $lx_current().thread_info $3 = {flags = 536870912 , syscall_work = 0 , status = 0 , cpu = 1 }
CEA的内存分配如下
1 2 3 IDT 一页0x1000 CPU0 sizeof (struct cpu_entry_area) = 0x3b000 CPU1 gdt 一页 之后才是entry_stack_page,size也是一页
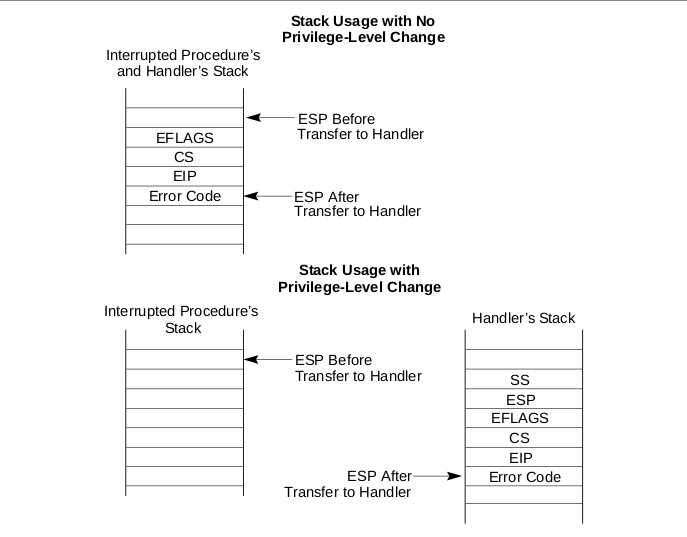
而切换到sp0指向的栈(弹性栈)时会自动push相关寄存器,而且是从sp0指向的栈顶向下增长,注意Error Code不是硬件自动push的
计算如下:
1 2 3 4 5 6 (gdb) p/x 0xfffffe0000000000 + 0x1000 + 0x3b000 + 0x1000 + 0x1000 $16 = 0xfffffe000003e000 (gdb) p/x 0xfffffe000003e000 - 40 $18 = 0xfffffe000003dfd8 >>因此这是entry_INT80_compat 的入口栈顶,也是CEA区域,但是CEA部分是只读部分
之后将rax寄存器push,此时Error Code保存的是系统调用号
然后切到内核栈
1 2 3 4 5 6 7 8 9 10 11 12 ... (gdb) n 325 movq PER_CPU_VAR(cpu_current_top_of_stack), %rsp >> movq %gs:cpu_current_top_of_stack, %rsp (gdb) n entry_INT80_compat () at arch/x86/entry/entry_64_compat.S:327 327 pushq 5 *8 (%rax) (gdb) p $rsp $19 = (void *) 0xffffc900003b0000 (gdb) p $lx_current().stack >>当前任务的内核栈 $20 = (void *) 0xffffc900003ac000 0xffffc900003ac000 + 0x4000 = 0xffffc900003b0000
在切换到新task __switch_to时,进行该任务下内核栈指针cpu_current_top_of_stack的设置
1 this_cpu_write(cpu_current_top_of_stack, task_top_of_stack(next_p));
%gs:cpu_current_top_of_stack指的该cpu下的cpu_current_top_of_stack 变量,计算方式为 per cpu区域基址 + cpu_current_top_of_stack的符号地址存储的数据
1 2 3 4 5 6 7 8 9 (gdb) p/x __per_cpu_offset $22 = {0xffff88803fc00000 , 0xffff88803fd00000 , 0xffffffff82cf5000 <repeats 510 times>} 000000000001b f10 D cpu_current_top_of_stack所以cpu1上的%gs:cpu_current_top_of_stack的值为 0xffff88803fd00000 + 0x1bf10 = 0xffff88803fd1bf10 指向的数据 (gdb) x/2 x 0xffff88803fd1bf10 >>注意这是一个指向64 位的地址 0xffff88803fd1bf10 : 0x003b0000 0xffffc900 >>0xffffc900003b0000
内核栈 内核栈指向当前该cpu上执行任务的线程栈,为任务结构体task_struct中的stack指向的空间。
1 2 (gdb) p $lx_current().stack >>当前任务的内核栈 $20 = (void *) 0xffffc900003ac000
内核栈顶表示为cpu_current_top_of_stack
内核栈分配为
1 2 3 4 5 6 7 8 9 +----------------+ <--高位 | | | struct pt_regs | < | | +----------------+ | | | | | | +----------------- <---低位
x64_32 系统调用中断流程总结 系统中断处理分为四部分
IDT和GDT组成的硬件中断处理寻址
进入内核态,entry_INT80_compat内部汇编处理,系统中断硬件强相关部分
SWAPGS切换gs寄存器,保证内核栈寻址正确
rax和rdi保存在弹性栈中
cr3进行页表切换,清除PCID和PGTABLE两位, KPTI相关
切换rsp到该任务运行cpu的内核栈底,并push相关寄存器
cld清除方向标志,将栈顶rsp给到第一个参数rdi
进入do_int80_syscall_32
do_int80_syscall_32内部处理
返回用户态 swapgs_restore_regs_and_return_to_usermode
POP_REGS pop_rdi=0将内核栈的寄存器pop到对应寄存器rsp切到弹性栈,保存返回时的寄存器信息到弹性栈 通过SWITCH_TO_USER_CR3_STACK进行cr3相关控制 SWAPGS切换gs寄存器64位下系统调用的实现 实现流程 关于SYSCALL, Intel架构文档是这么描述的
5.8.8 Fast System Calls in 64-Bit Mode
从以上可以得知syscall调用后将从IA32_LSTAR MSR寄存器中读一个64位的地址,当作下一个执行的指令,存放在RIP寄存器,当然我们系统启动时得先通过WRMSR指令将一个地址写到IA32_LSTAR下。同时获取目标代码段,堆栈等。
linux下整体的中断向量表定义为:linux/arch/x86/include/asm/irq_vectors.h
1 #define IA32_SYSCALL_VECTOR 0x80
系统调用对应底层RIP入口实现为:
1 2 3 4 5 SYM_CODE_START(entry_INT80_compat) SYM_CODE_START(entry_SYSCALL_64)
在系统启动CPU 初始化时,通过wrmsr函数写MSR_LSTAR完成MSR IA32_LSTAR寄存器的赋值
1 2 3 4 5 6 7 void syscall_init (void ) wrmsr(MSR_STAR, 0 , (__USER32_CS << 16 ) | __KERNEL_CS); wrmsrl(MSR_LSTAR, (unsigned long )entry_SYSCALL_64); ... }
wrmsr函数的具体实现 1 2 3 4 5 6 7 8 9 10 11 12 13 14 15 16 17 18 19 20 static inline void wrmsrl (unsigned int msr, u64 val) native_write_msr(msr, (u32)(val & 0xffffffff ULL), (u32)(val >> 32 )); } static noinline __attribute__((__unused__)) void notracenative_write_msr(unsigned int msr, u32 low, u32 high) { __wrmsr(msr, low, high); if (tracepoint_enabled(write_msr)) do_trace_write_msr(msr, ((u64)high << 32 | low), 0 ); } static __always_inline void __wrmsr(unsigned int msr, u32 low, u32 high){ asm volatile ("1: wrmsr\n" "2:\n" _ASM_EXTABLE_TYPE(1b , 2b , EX_TYPE_WRMSR) : : "c" (msr), "a" (low), "d" (high) : "memory" ) }
从代码看,内联汇编 输入部分为 MSR_LSTAR给ecx, 函数地址低位给eax, 高位给edx.
当然既然有wrmsr,就有rdmsr.
Inter 文档是这么描述wrmsr 和 rdmsr指令的
2.8.7 Reading and Writing Model-Specific Registers
2.8.7.1 Reading and Writing Model-Specific Registers in 64-Bit Mode
从上面我们可以看出,rdmsr和wrmsr是如何操控MSR
都需要指明一个32位的地址存放在ECX1 2 3 4 #define MSR_STAR 0xc0000081 #define MSR_LSTAR 0xc0000082 #define MSR_CSTAR 0xc0000083
读写都是通过edx:eax 寄存器, dex->high位, eax->low位 实践-内联汇编读取MSR 指定寄存器 Arch:x86_64 一个读取MSR 中存储SYSCALL地址寄存器的驱动 1 2 3 4 5 6 7 8 9 10 11 12 13 14 15 16 17 18 19 20 21 22 23 24 25 26 27 28 29 30 31 #define MSR_LSTAR 0xc0000082 #define asm __asm__ #define volatile __volatile__ #define ULL1 unsigned long long ULL1 noinline rdmsr_test (ULL1 msr) { ULL1 low, high; asm volatile ("1: rdmsr\n" "2: \n" : "=a" (low), "=d" (high) : "c" (msr) :) return (low | high << 32 ); } EXPORT_SYMBOL(rdmsr_test); static int rdmsr_init (void ) ULL1 syscall_address; pr_info("module rdmsr enter\n" ); syscall_address = rdmsr_test(MSR_LSTAR); pr_info("syscall address is %px in arch x86_64\n" , (void *)syscall_address); return 0 ; } static void rdmsr_exit (void ) pr_info("module rdmsr exit\n" ); }
插入模块打印
1 2 3 / # insmod rdmsr.ko [ 222.170159 ] module rdmsr enter [ 222.183059 ] syscall address is ffffffff81c00000 in arch x86_64
实际上ffffffff81c00000就是entry_SYSCALL_64的symbol
linux实现代码细节 gdb抓取guest中args-x86_64程序下entry_SYSCALL_64入口堆栈分析,代码见解析命令行参数-64位汇编 :
因为短时间内syscall触发的次数很多,我们需要通过一个关键点判断是否为args-x86_64程序触发,
1 2 3 4 5 6 ➜ x86-busybox-rootfs objdump -dS args-x86_64 ... syscall 4000 a3: 0f 05 syscall jmp vnext 4000 a5: eb d2 jmp 400079 <vnext>
发现next-rip为4000a5,因此entry_SYSCALL_64断点触发以后rax应该是4000a5
1 2 3 4 5 6 7 8 9 10 11 12 13 14 15 (gdb) target remote:1234 Remote debugging using :1234 0xffffffff81b0e21b in native_safe_halt () at ./arch/x86/include/asm/irqflags.h:51 51 asm volatile ("sti; hlt" : : :"memory" ) (gdb) b entry_SYSCALL_64 Breakpoint 1 at 0xffffffff81c00000 : file arch/x86/entry/entry_64.S, line 91. (gdb) c Continuing. ... Thread 2 hit Breakpoint 1 , entry_SYSCALL_64 () at arch/x86/entry/entry_64.S:91 91 swapgs(gdb) p/x $rcx $1 = 0x4000a5 >>是由我们触发 (gdb) p $rsp $2 = (void *) 0x7ffc9fcc79f0 >>此时在用户态堆栈,而不是在弹性栈
之后将pt_regs需要的寄存器部分入栈,并将栈顶指针给到rdx作为第一个参数, rax(保存的是系统调用number)作为第二个参数entry_SYSCALL_64反汇编
`entry_SYSCALL_64`反汇编 1 2 3 4 5 6 7 8 9 10 11 12 13 14 15 16 17 18 19 20 21 22 23 24 25 26 27 28 29 30 31 32 33 34 35 36 37 38 39 40 41 42 43 44 45 46 47 48 49 50 51 52 53 54 55 56 57 58 59 60 61 62 63 64 65 66 67 68 69 70 71 72 73 74 75 76 77 78 79 80 81 82 83 84 85 86 87 88 89 90 91 92 93 94 95 96 97 98 99 100 101 102 103 104 105 106 (gdb) disassemble entry_SYSCALL_64 ... >>swapgs mov %rsp,%gs:0x6014 >>保存用户rsp到sp2 cr3切换,然后切到内核栈 ... 0xffffffff81c00029 <+41 >: push $0x2b >>用户数据段 0xffffffff81c0002b <+43 >: push %gs:0x6014 >>用户栈顶rsp 0xffffffff81c00033 <+51 >: push %r11 >>标志位,第一次push,作为eflags 0xffffffff81c00035 <+53 >: push $0x33 >>用户代码段 0xffffffff81c00037 <+55 >: push %rcx >>用户next rip,第一次push rcx,作为保留的rip 0xffffffff81c00038 <+56 >: push %rax 0xffffffff81c00039 <+57 >: push %rdi 0xffffffff81c0003a <+58 >: push %rsi 0xffffffff81c0003b <+59 >: push %rdx 0xffffffff81c0003c <+60 >: push %rcx >>第二次push rcx, 0xffffffff81c0003d <+61 >: push $0xffffffffffffffda 0xffffffff81c0003f <+63 >: push %r8 0xffffffff81c00041 <+65 >: push %r9 0xffffffff81c00043 <+67 >: push %r10 0xffffffff81c00045 <+69 >: push %r11 >>第二次push标志位 0xffffffff81c00047 <+71 >: push %rbx 0xffffffff81c00048 <+72 >: push %rbp 0xffffffff81c00049 <+73 >: push %r12 0xffffffff81c0004b <+75 >: push %r13 0xffffffff81c0004d <+77 >: push %r14 0xffffffff81c0004f <+79 >: push %r15 0xffffffff81c00051 <+81 >: xor %edx,%edx 0xffffffff81c00053 <+83 >: xor %ecx,%ecx 0xffffffff81c00055 <+85 >: xor %r8d,%r8d 0xffffffff81c00058 <+88 >: xor %r9d,%r9d 0xffffffff81c0005b <+91 >: xor %r10d,%r10d 0xffffffff81c0005e <+94 >: xor %r11d,%r11d 0xffffffff81c00061 <+97 >: xor %ebx,%ebx 0xffffffff81c00063 <+99 >: xor %ebp,%ebp 0xffffffff81c00065 <+101 >: xor %r12d,%r12d 0xffffffff81c00068 <+104 >: xor %r13d,%r13d 0xffffffff81c0006b <+107 >: xor %r14d,%r14d 0xffffffff81c0006e <+110 >: xor %r15d,%r15d 0xffffffff81c00071 <+113 >: mov %rsp,%rdi >>采用栈指针方式传递参数 0xffffffff81c00074 <+116 >: movslq %eax,%rsi >>为什么采用扩展位?为了安全吗? 0xffffffff81c00077 <+119 >: call 0xffffffff81afa0e0 <do_syscall_64> >>实际系统调用处理 0xffffffff81c0007c <+124 >: nop 0xffffffff81c0007d <+125 >: nop 0xffffffff81c0007e <+126 >: nop 0xffffffff81c0007f <+127 >: nop 0xffffffff81c00080 <+128 >: nop 0xffffffff81c00081 <+129 >: mov 0x58 (%rsp),%rcx >>复原rcx寄存器 0xffffffff81c00086 <+134 >: mov 0x80 (%rsp),%r11 >>将用户栈下一个的rip暂存在r11中 0xffffffff81c0008e <+142 >: cmp %rcx,%r11 >>因为都是push的rcx,应该是相等的才对 0xffffffff81c00091 <+145 >: jne 0xffffffff81c00ed0 <common_interrupt_return> 0xffffffff81c00097 <+151 >: shl $0x10 ,%rcx >>5 级页表特性相关 0xffffffff81c0009b <+155 >: sar $0x10 ,%rcx 0xffffffff81c0009f <+159 >: cmp %rcx,%r11 0xffffffff81c000a2 <+162 >: jne 0xffffffff81c00ed0 <common_interrupt_return> 0xffffffff81c000a8 <+168 >: cmpq $0x33 ,0x88 (%rsp) >>检查保存的cs段选择是正确的 0xffffffff81c000b1 <+177 >: jne 0xffffffff81c00ed0 <common_interrupt_return> 0xffffffff81c000b7 <+183 >: mov 0x30 (%rsp),%r11 >>r11复原 0xffffffff81c000bc <+188 >: cmp %r11,0x90 (%rsp) >>>>保证r11=eflags 0xffffffff81c000c4 <+196 >: jne 0xffffffff81c00ed0 <common_interrupt_return> 0xffffffff81c000ca <+202 >: test $0x10100 ,%r11 0xffffffff81c000d1 <+209 >: jne 0xffffffff81c00ed0 <common_interrupt_return> 0xffffffff81c000d7 <+215 >: cmpq $0x2b ,0xa0 (%rsp) >>检查保存的ds段选择是正确的 0xffffffff81c000e0 <+224 >: jne 0xffffffff81c00ed0 <common_interrupt_return> >>开始恢复用户栈现场 0xffffffff81c000e6 <+230 >: pop %r15 0xffffffff81c000e8 <+232 >: pop %r14 0xffffffff81c000ea <+234 >: pop %r13 0xffffffff81c000ec <+236 >: pop %r12 0xffffffff81c000ee <+238 >: pop %rbp 0xffffffff81c000ef <+239 >: pop %rbx 0xffffffff81c000f0 <+240 >: pop %rsi >>r11的值保存在了rsi中,之后rsi会被保存的rsi覆盖 0xffffffff81c000f1 <+241 >: pop %r10 0xffffffff81c000f3 <+243 >: pop %r9 0xffffffff81c000f5 <+245 >: pop %r8 0xffffffff81c000f7 <+247 >: pop %rax 0xffffffff81c000f8 <+248 >: pop %rsi 0xffffffff81c000f9 <+249 >: pop %rdx 0xffffffff81c000fa <+250 >: pop %rsi 0xffffffff81c000fb <+251 >: mov %rsp,%rdi >>保存指向栈中rdi的指针 0xffffffff81c000fe <+254 >: mov %gs:0x6004 ,%rsp >>切换到弹性栈 0xffffffff81c00107 <+263 >: push 0x28 (%rdi) >>保存rsp 0x7ffc9fcc79f0 0xffffffff81c0010a <+266 >: push (%rdi) >>保存rdi >>cr3切换开始 0xffffffff81c0010c <+268 >: push %rax 0x00000001 0xffffffff81c0010d <+269 >: jmp 0xffffffff81c00152 <entry_SYSCALL_64+338 > 0xffffffff81c0010f <+271 >: mov %cr3,%rdi 0xffffffff81c00112 <+274 >: jmp 0xffffffff81c00148 <entry_SYSCALL_64+328 > 0xffffffff81c00114 <+276 >: mov %rdi,%rax 0xffffffff81c00117 <+279 >: and $0x7ff ,%rdi 0xffffffff81c0011e <+286 >: bt %rdi,%gs:0x2ca96 0xffffffff81c00128 <+296 >: jae 0xffffffff81c00139 <entry_SYSCALL_64+313 > 0xffffffff81c0012a <+298 >: btr %rdi,%gs:0x2ca96 0xffffffff81c00134 <+308 >: mov %rax,%rdi 0xffffffff81c00137 <+311 >: jmp 0xffffffff81c00141 <entry_SYSCALL_64+321 > 0xffffffff81c00139 <+313 >: mov %rax,%rdi 0xffffffff81c0013c <+316 >: bts $0x3f ,%rdi 0xffffffff81c00141 <+321 >: or $0x800 ,%rdi 0xffffffff81c00148 <+328 >: or $0x1000 ,%rdi 0xffffffff81c0014f <+335 >: mov %rdi,%cr3 0xffffffff81c00152 <+338 >: pop %rax >>弹性栈出栈 >>cr3切换结束 0xffffffff81c00153 <+339 >: pop %rdi 0xffffffff81c00154 <+340 >: pop %rsp 0xffffffff81c00155 <+341 >: swapgs 0xffffffff81c00158 <+344 >: rex.W sysret
继续gdb debug
1 2 3 4 5 6 7 8 9 10 11 12 13 14 15 16 17 18 19 20 21 22 23 24 25 26 27 28 29 30 31 32 33 34 35 36 37 38 39 40 (gdb) b do_syscall_64 Breakpoint 2 at 0xffffffff81afa0e0 : file arch/x86/entry/common.c, line 74. (gdb) n 10 Thread 2 hit Breakpoint 2 , do_syscall_64 (regs=0xffffc900004cbf58 , nr=1 ) at arch/x86/entry/common.c:74 74 {(gdb) p/x $rax $2 = 0x1 >>对应sys_write num (gdb) n 75 add_random_kstack_offset();(gdb) n 76 nr = syscall_enter_from_user_mode(regs, nr);(gdb) n 80 if (!do_syscall_x64(regs, nr) && !do_syscall_x32(regs, nr) && nr != -1 ) {(gdb) b do_syscall_x64 Breakpoint 3 at 0xffffffff81afa0f5 : file arch/x86/entry/common.c, line 48. (gdb) c Continuing. Thread 1 hit Breakpoint 3 , do_syscall_x64 (nr=1 , regs=0xffffc90000427f58 ) at arch/x86/entry/common.c:48 48 if (likely(unr < NR_syscalls)) {(gdb) n 49 unr = array_index_nospec(unr, NR_syscalls);(gdb) n 50 regs->ax = sys_call_table[unr](regs); >>我们构建的syscall函数表 ,下标1 对应__x64_sys_write(gdb) p sys_call_table $11 = 0xffffffff820002a0 <sys_call_table> (gdb) p sys_call_table[1 ] $12 = (const sys_call_ptr_t ) 0xffffffff8130f9b0 <__x64_sys_write> (gdb) disassemble __x64_sys_write Dump of assembler code for function __x64_sys_write: 0xffffffff8130f9b0 <+0 >: nopl 0x0 (%rax,%rax,1 ) 0xffffffff8130f9b5 <+5 >: mov 0x60 (%rdi),%rdx 0xffffffff8130f9b9 <+9 >: mov 0x68 (%rdi),%rsi 0xffffffff8130f9bd <+13 >: mov 0x70 (%rdi),%rdi 0xffffffff8130f9c1 <+17 >: jmp 0xffffffff8130f8d0 <ksys_write> ->最终执行的函数,三个参数,rdi, rsi, rdx
grep发现__x64_sys_write在fs/read_write.o,因此从read_write找函数实现。
1 2 3 4 5 6 7 8 9 10 11 12 SYSCALL_DEFINE3(write, unsigned int , fd, const char __user *, buf, size_t , count) { return ksys_write(fd, buf, count); >>write属于使用三个参数的,因此使用SYSCALL_DEFINE3 } #define SYSCALL_DEFINE3(name, ...) SYSCALL_DEFINEx(3, _##name, __VA_ARGS__) #define SYSCALL_DEFINEx(x, sname, ...) \ SYSCALL_METADATA(sname, x, __VA_ARGS__) \ >>默认CONFIG_FTRACE_SYSCALLS=y,方便我们ftrace 抓取系统调用事件 __SYSCALL_DEFINEx(x, sname, __VA_ARGS__)
x64_64 syscall流程总结 系统启动时存放syscall底层入口到指定MSR,之后应用程序 通过syscall汇编指令将该MSR的值放到RIP,切到内核态,或者称为特权模式(ring 0),即获取内核对应的代码段和堆栈,之后进行内核态执行
x86与x86_64系统调用对比 x86是通过中断trap门逻辑,而x86_64是通过MSR来切换RIP的。 疑问 现在都是直接寻址,即虚拟地址都是线性地址,不再需要段寻址,直接页寻址即可,因此cs和ss(数据段)除了兼容之外,在直接寻址的堆栈保存和恢复中没有作用 名词 1. IDT INTERRUPT DESCRIPTOR TABLE
2. TSS Task-State Segment 通过segment中保存的task信息来恢复处理现场
3. IST Interrupt Stack Table 参考 add_random_kstack_offset Intel® 64 and IA-32 Architectures Software Developer’s Manual Volume 3A: System Programming Guide, Part 1